Sunday, September 4, 2011

Yellow Split Pea and Leek Soup

I really enjoy encouraging people to try plant based foods and recipes, and just recently bought the book Forks Over Knives, and am awaiting my DVD of the same name.  The American people are suffering from preventable diseases which can be not only prevented, but eliminated, if they would just change the foods they eat.  Hypertension, Type II diabetes, and heart disease are amongst a few such ailments that all respond beautifully to eliminating animal based foods from the diet, especially the casein that comes from milk.  A plant based diet isn't about what you can't eat anymore, it's about now going out and experiencing the vast array of foods that are available, that maybe you haven't tried!

This is a recipe that as a child and young adult, that I would have snubbed my nose at!  Who in the world eats split peas?  Aren't they green mush?  NOT AT ALL! Esp when you use yellow split peas!  The split peas do have to cook for about an hour first, then it all goes together very quickly!

Even though today is a warm August day, and a little humid, I'm looking forward to making this for the colder fall and winter days.


Yellow Split Pea and Leek Soup
adapted from FOK

1 cup dried yellow split peas
3 cups of water
2 cups of vegetable broth
1 long celery stalk or 2 small ones, diced finely
1 large leek, cut in half and washed, diced finely
1 large carrot, diced finely
1/2-1 of a half-hot pepper or pepper of choice, diced finely
1/2 tsp thyme
1/2 tsp salt

Bring 3 cups of water to a boil in a medium pan, add split peas, and bring back to a boil, and move pan to a small burner and simmer gently on low for approximately one hour till the peas are soft. Watch your water level if you have a hot burner, as you don't want to scortch the peas on the bottom of the pan. 

When peas are cooked, add the vegetable broth, and remaining vegetables.  Simmer again for approx 20 minutes till vegetables are cooked through.  Add the thyme and salt, and stir well.

This will give you 3-4 servings.  Serve with whole grain crackers or bread and a salad!


Saturday, August 27, 2011

3 ingredient raw Mango Sorbet

recipe by Mimi Kirk, a RAW food guru, who at the age of 73, looks fabulously better than most 50 yr olds!  Find her and this video on youtube HERE


Raw mango sorbet
RAW MANGO SORBET

2 mangos, peeled, pitted and chopped
2 Tbsp of sweetener like agave or maple syrup, or use several drops of stevia.
1 lemon, juiced

Place chopped mangos in a high speed blender like a Vitamix, or in a food processor, and add lemon juice and sweetener. Blend until nice and smooth.

Pour mixture into a wide plastic container to be placed in the freezer, and every 1/2 hour, stir, incorporating the slushy sides into the middle. When firm, but not frozen solid, spoon into dessert cups and enjoy!

Great Granola~ A blueberry, apricot, cashew blend!

I have to say that I love the recipe source's website name....it's the G spot Revolution....and before you get all excited, it's not just about that. It's about whatever makes you happy! find Caroline and her awesome food website at The G Spot Revolution.  This particular post caught my eye since it's a granola recipe, and my hubby LOVES granola.  It also happens to be a NO ADDED OIL recipe too, which totally fits into my collection!


blueberry, apricot, cashew granola
Slow-Bake Blueberry Apricot Cashew Granola (gluten-free + vegan)


2 cups (gluten-free) oats - or not if you're not gluten free
1/2 cup dried apricots, chopped
1/2 cup cashews, chopped
3/4 cup maple syrup
1/4 cup unsweetened, shredded coconut
1/4 teaspoon sea salt
1/2 cup blueberry puree


Directions
Preheat oven to 300 degrees. Prepare a baking sheet by lining with parchment paper or baking mat (like this).
Mix ingredients (oats through salt) in a medium bowl.
Puree blueberries by placing 1/2 cup – 3/4 cup fresh blueberries in a blender or food processor and pulsing. Pour puree into a 1/2 cup measuring cup and then add to oat mixture. Stir to combine.
Spread mixture onto parchment paper and bake 40 – 45 minutes or until golden brown. (Stir/toss the granola with a spatula halfway through the bake time to ensure even baking.) Allow granola to cool completely on the baking sheet. Store in an airtight container.

NOTE: One reader said this granola took her 65 minutes to bake — and that’s OK! While that is a particularly long bake time, keep in mind every oven is different and patience is a virtue with this particular batch. In addition, the type of oats you are using (e.g. thick rolled oats versus old fashioned rolled oats) will affect bake time. This granola should not be moist — make sure it is golden brown when you take it out. (Thanks to Jessica for reporting her results!)


^^^^^that was me! I had to bake this a longer time than she did, but it did come out golden brown.  Just be sure to watch it, and you don't want it to still me moist when you take it out.  Bake it a few more minutes at at time if needed.

Sunday, April 24, 2011

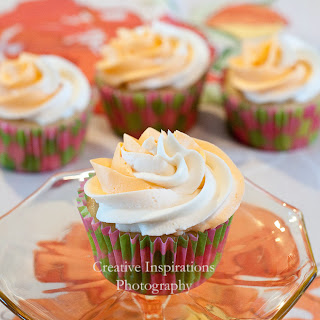
Vegan Creamsicle and Root Beer Float cupcakes! Oh MY!!!!!

This has been the best invention yet, I believe. Who doesn't like creamsicles or Root Beer floats? They are the epitome of summertime deliciousness! BUT....when you go vegan, you choose not to eat the standard brand ice creams or desserts that are on the market. Of course there are awesome vegan brand ice creams out there, but I just don't happen to buy them.....but I LOVE baking cupcakes, which lead to trying some new flavors.

The basic vanilla cake mix recipe is from Vegan Cupcakes Take Over the World, again, by Isa and Terry. Love these recipes. They are excellent and bake up perfectly.

The only difference between the two, is the two flavorings used. Both have plain frosting filling in the cupcakes too. I think I do that on most of my cupcakes now....it just adds an additional surprise to the eater~

Vegan creamsicle cupcakes


vegan rootbeer float cupcakes


Vanilla Cupcake Recipe:

1 cup of non dairy milk and I use soy milk
1 tsp of apple cider vinegar
1 1/4 cups of flour
2 T of cornstarch
3/4 tsp baking powder
1/2 tsp baking soda
1/2 tsp salt
1/3 cup of canola oil
3/4 cup granulated sugar
2 tsp vanilla extract *** (see options below)
1/4 tsp almond, caramel or more vanilla ***


Preheat oven to 350 degrees. Place cupcake liners in pan. Measure soy milk in a liquid measuring cup, add cider vinegar and mix. Let sit for a few minutes to curdle, then add sugar and oil and extracts, and whisk together. In a large bowl, sift the flour, cornstarch, baking powder soda, and salt together. Add the liquid ingredients to the dry, and mix till thoroughly combined and no large lumps remain. Fill cupcake liners 2/3 full, and bake for 20-22 minutes. Check for doneness with a toothpick. Transfer to a wire cooling rack and frost when completely cool.


***** Creamsicle cupcakes: Use 1 1/2 tsp of pure Orange extract (I used McCormicks)in the batter, and another 3/4 tsp to 1/3-1/2 of frosting recipe- kind of a taste as you go. I like tasting the orange personally (See below). I added orange Wilton food coloring to the batter with the orange extract, and the white frosting has no added flavoring in it.

In a pastry bag with it folded outward, place the colored frosting in half the bag, and the white in the other half, and using a 1M large decorating tip, start around the outer edge, and pipe around, and inward to make it twist-like.  See Wilton's page here to see how to hold the bag.


***For the rootbeer floats, I used 2 tsp of McCormick's Root Beer Concentrate in the batter, and then another 1+ tsp in half the frosting....Again, use your own judgement in how strong or weak you like the flavor. This amt worked for me. Be aware that the concentrate will make a brown frosting, and was piped with just the open end of a pastry decorating bag, then smoothed, before the small balls of white frosting were applied. For the small icing balls, I used the small end of a melon baller. Small scoops with a spoon could work too.  Then cut colored straws down, taking about 2 1/2- 3 inches off the bottom, and bend the straw, as if it were in a soda, and place strategically!


Standard buttercream frosting

1/2 cup Earth Balance non hydrogenated margarine (or reg marg)
1/2 cup non hydrogenated vegetable shortening
4 1/2-5 cups of confectioner's sugar
1/4 cup soy milk
1 tsp vanilla (or other extracts as desired)

This makes a moderately stiff frosting, thin or stiffen as you see fit.  Cream with margarine and shortening with an electric mixer, add powdered sugar, milk, and extract and continue to mix till nice, light and fluffy, for several minutes.

Friday, April 8, 2011

Quinoa Burgers made with chickpeas and served with a lemon dill sauce.

I am a self proclaimed (vegan) cookbook lover! I read them like others read novels. I get immersed in the pictures (no wonder!), and I love to see how others combine ingredients, spices, and herbs. I can follow directions to a "T", and according to a patient of mine, he says I'm a good German girl, because of it. I usually don't deviate from recipes too far, unless I actually don't have an ingredient, or I know I want to make some changes.

Which leads into my recommendation of a fairly new cookbook that is out now, by the name of Vegan Diner- classic comfort food for the soul, by Julie Hasson, who is well known on her Everyday Dish TV.
Can I tell you how much I L-O-V-E this cookbook??? Simple down home cooking that tastes great!

The quinoa burger recipe comes from that cookbook, and I only changed the spice blend I used, which she encourages the reader to do, to fit their taste.  Quinoa is naturally gluten free, which is a plus for so many too!

quinoa burger


The adapted recipe for

Quinoa Burgers from Vegan Diner, by Julie Hasson

1/2 cup diced yellow onion
3 cloves garlic
12 oz chickpeas, (about 1 1/2 cups canned and drained, or homemade)
1/2 cup quick oats (not instant)
1 1/2 cups cooked quinoa ***
1/4 cup minced fresh parsley
1 tsp of poultry seasoning or favorite spice blend (I used a local blend called Symeon's Seasoning from a local restaurant)
1 tsp of smoked paprika
2 Tbsp Braggs Liquid Amino or soy sauce
2 Tbsp of chickpea flour
1/2 tsp salt or to taste
freshly ground pepper, to taste
additional chickpea flour for dusting the burgers
olive oil for cooking
Burger buns
Lettuce or greens
sliced tomato and onion for serving

Makes 6 burgers. Add the onion and garlic to a food processor bowl, and pulse till finely chopped. Add the chickpeas and oats, and pulse until well mixed, but not pureed. Remove to a large bowl, and stir in the quinoa, parsley, poultry seasoning or spice mix, smoked paprika, Braggs, and chickpea flour. Stir in 1-2 Tbsp of water if necessary to help the burger mixture stick together, but you don't want it too moist. Add salt and pepper to taste. Thoroughly mix the ingredients well, cover the bowl, and refrigerate for 15 minutes. Form the burger mixture into 6 balls, and press into 3 1/2-4 inch patties.

quinoa burger patties

Heat a large cast iron skillet or heavy duty fry pan over medium high heat. And lightly coat or spray with olive oil. Place the chickpea flour on a small plate and dust the burgers on all sides with the flour. Add the burgers to the hot skillet. Cook the patties for about 5 minutes, or until nicely browned and crispy. Reduce the heat to medium if necessary, to continue cooking without burning. Add more olive oil if needed, to keep the burgers from sticking. Flip the burgers over and cook on the other side. Repeat with the remaining burgers.

Remove from the skillet and let sit for minutes before serving. Letting the burgers rest will give them a better texture. Serve on a roll with all of the fixings you like, or serve or a salad as shown.


*** to cook quinoa, bring 1 1/2 cups of water to a boil in a pan on the stove, rinse 3/4 of a cup of quinoa in a mesh strainer under running water. Once water is boiling, add the quinoa, cover and cook for 12-15 minutes till the quinoa appears spiraled, and the water is absorbed. ( I like to add vegetable stock powder to the water for a little extra taste, and then reducing the amt of salt added to the recipe)


Lemon Dill sauce

1/4 cup Vegenaise (or mayo)
1 Tbsp lemon juice
1/2-1 tsp dried dill
1/2-1 tsp of garlic powder
freshly ground pepper, to taste

Mix in a small bowl and add as a topping to your burger. If you like a lot of sauce, you may want to double the recipe. (I only used a small amt to keep the calories down)

Thursday, March 31, 2011

Delicious tempeh salad

I am a self proclaimed tofu disliker, 1) unless it's in dessert, or 2) it's prepared by a restaurant. But tempeh is wonderful! With all of the soy bashing in the news, it's good to know what kinds of soy you should be consuming.

Tempeh is a feremented soy product, made with chopped up soy beans and mixed with Rhizopus olligosporus, and allowed to ferment, then packaged, creating an easier to digest food. It is one of the approved and suggested soy foods to eat, vs. all of the soy isolates that can be found in nearly every packaged food on the market.

This salad is so delicious, you'll be tempted to just eat it out of the bowl, like I did, after the pictures were taken. This makes a great hor dourve served on top of crackers, or as a sandwich filling. I must be in the mood for lighter dinner or lunch fare, wishing spring would finally spring!


This recipe is my own:

8 oz package of your favorite tempeh, cut into 10 pieces, (place in a pan of water, just covering the tempeh, bring to a boil, and lightly simmer for 15 minutes. This helps improve the flavor, and reduces it's denseness. Drain and let cool, then finely chop into small pieces)

1 tsp garlic salt
1 tsp onion powder
1/8 tsp of black pepper
1/4 tsp of celery seed
1/4 of a medium red onion, finely chopped
2 celery stalks, finely chopped
1 carrot peeled and finely chopped
3 Tbsp of pickle relish (or chopped pickles)
2 tsp of dijon mustard
scant 1/3 cup of Vegenaise mayo or regular mayo
2 Tbsp of chopped flat leaf parsley

Comine all to cooled and finely chopped tempeh, adjust salt and pepper to your liking. I prefer this to sit for several hours to overnight before using it. It helps the flavors infuse the tempeh!

tempeh salad


Wednesday, March 30, 2011

Fresh raw veggie spring rolls with dressing.

I looovvveee spring rolls! How about you? It's also one of my hubby's favorite lunches, and this recipe went over particularly well. I originally saw the post on Tastespotting.com, I believe, and it was simply a cold salad, beautifully presented. The salad contents aren't anything new really, but the dressing sure did make the veggies a pleasure to eat!

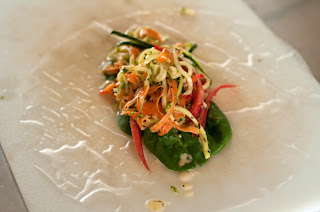
Basically you take a whole zucchini and either spiralize it, or in my case, I used my Pampered Chef julienne shredder "thingy" and julienned my zucchini. Then I used my vegetable peeler to shred the carrots, and finely chopped some broccoli to add to the mix, along with some red peppers. She suggested mixing the dressing with the veggies to soften them a bit......This was all perfect, my next step was to make spring rolls out of the shredded veggies, instead of just placing them on a plate.  I let the mixture sit in the fridge for about 45 minutes before rolling them up.

To prepare the spring rolls, you'll need a pie plate large enough to set the roll in it, and fill it with hot water.. The rolls will come out the package as rigid discs, but as soon as you put one in the hot water, it immediately softens. Within seconds you'll feel the starch give, and you can pull it out and place it on the cutting board, spreading out any wrinkles. Only do one or two at a time.

veggies in spring roll
I placed several spinach leaves down as the base, then placed a large "fingers-full" amt of vegetable salad on top.

veggies being rolled in spring roll
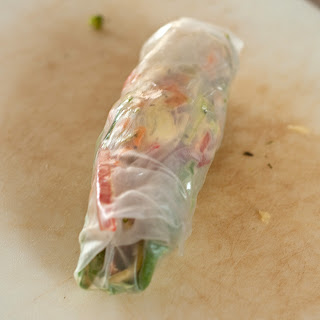
Fold the top and bottom edges over the salad, burrito style, then pull one of the remaining sides over the filling, and then roll into a cigar shaped log.
raw veggies in spring roll
cut on the diagonal, and enjoy!  I was able to make 7 spring rolls with this recipe, although probably could have made 8.

The recipe comes from Loves Veggies and Yoga.

Raw Pasta Salad with Creamy Lemon & Herb Dressing


For the Salad:
1 zucchini, spiralized
1/2 c mixed vegetables (carrots, broccoli, green beans, cucumber slices, radishes, tomatoes, peapods, bell peppers, whatever you have on hand)

Optional: 1/2 c protein (edamame, diced tofu, garbanzo/white/navy/cannelloni beans, quinoa, etc.)

For the Dressing:

1/4 c mayo (Vegenaise)
2 – 3 tbsp maple syrup, agave, or brown rice syrup
1 tbsp lemon juice
1 tsp EVOO
1 tsp basil (fresh or dried)
1/2 tsp dill
1/2 tsp fresh-ground pepper, or to taste
pinch salt, optional

Stir to combine

Directions:

Spiralize the zucchini.
Add the diced vegetables and protein.

Coat and toss with dressing. Doing this 15-20 minutes prior to eating will allow the dressing to soften the noodles and give them a more cooked taste and texture. Or simply mircowave the entire plate of food for 30 seconds if you want a “hot meal”.

Feel free to use the left over dressing as a dipping sauce!

Yields: 2 healthy sized plates of food, or 3 more medium sized plates, or 7-8 spring rolls.

I have found the healthiest frozen dessert recipe, and I'm in LOVE!

I think the original picture showed up on one of the food porn sites like Tastespotting or Foodgawker and it said two ingredient "ice cream", and frankly, I was intrigued. I visited the site, but then checked out another one or two sites, and came up with this.....It's basically out there in cyber world, so there really isn't any one person to credit....I actually think even the Vitamix blender company may have the treat in their cookbook.

Anyway, I have never been a person to just store cut up frozen bananas in the freezer.....until now! I know they're great for making smoothies cold, but the frozen chunks of bananas are the basis of this recipe!


the RECIPE is actually very simple......for one serving....cut up a banana in several chunks, place on some wax paper or plastic wrap on a plate for about 45 minutes in the freezer. After they are frozen, in a small glass bowl, place 1 1/2 tsp each of coconut oil, maple syrup or agave, and cocoa powder in it, and microwave for 15 seconds. Remove from the oven, and stir till smooth and creamy. 


Next, add the frozen bananas to a food processor or sturdy blender, and add 1 Tbsp of cocoa. I did this today, and ended up adding 2-3 tsp of maple syrup to add some liquid to it to get the blending started.


Blend till the bananas form a nice smooth and creamy dessert, with no or few lumps.


(this is pure vegan heavenly deliciousness, right here!)
Place in a dessert cup, and drizzle the chocolate sauce over the "ice cream". It will be the consistancy of soft serve ice cream. Add your favorite toppings of coconut flakes, nuts, chocolate chips, or whatever fits your fancy!


Saturday, March 26, 2011

I've expanded my baking experience with a wonderful vegan gluten free chocolate cupcake recipe.

Karina from the Gluten Free Goddess website truly has the biggest gluten free cooking and baking website online! She has extensive recipes for baking and cooking, due to her own allergies. She has vegan and non vegan recipes alike, and a fantastic page on GF substitutions here. It was very educational reading up on the different flours used and combined to get nearly the same results as regular baking.

So recently, a co worker was diagnosed with celiac disease, and it turned her world upside down, especially when she has a family to feed, and many of her regular favorite foods are now off limits. It's still a learning process for them, but Karina's website was the first one I gave to her, to brush up on all of the ins and outs of GF cooking. I came into play, being the baker at work for the rest of our coworkers, wanting to be able to share some goodies with her too, since she was being left out.

What I didn't realize is the variables for baking, with so many options for flours. I had picked up some sorghum flour, potato flour, (then there is potato starch too-not to be confused!), and some xanthan gum. Then my search began for a vegan recipe for me, but a GF recipe for her that would use these ingredients. And Karina's site came to the rescue with the recipe for GF chocolate cupcakes with coffee icing. It fit the bill for vegan and GF!


I am not gluten sensitive or intolerant at all, so I had no idea what to expect when eating these cupcakes, but they were really good! I was surprised at how high they rose, and the recipe did make 12 cupcakes as  the instructions said. They were light and airy, and very moist. What else do you need in a cupcake, as long as it looks pretty too!

I didn't use Karina's exact coffee icing recipe, but I did use Earth Balance margarine instead of the spectrum shortening, and ended up doubling it, since frosting the cupcakes with the rosettes, required a larger amt of frosting. I must not have made the coffee strong enough, as I didn't even taste it, so I added 1/2 tsp of organic almond extract to each batch of frosting, instead of the vanilla. (1 tsp extract for a double batch of her recipe). They were just as nice as any of my previously made vegan recipes, and I highly recommend giving it a try!

Vegan Chocolate Cupcakes Recipe with Coffee Icing


If you don't care for the taste of coffee, use plain water or a light rice milk in the batter in place of the coffee and make a vanilla or chocolate flavored icing.

Preheat the oven to 350 degrees F. Line a 12-cup cupcake pan with paper liners.
Whisk together the dry ingredients:

3/4 rounded cup sorghum flour
3/4 rounded cup potato starch, cornstarch or tapioca starch
1/2 cup unsweetened cocoa powder
1 cup organic cane sugar
1/2 teaspoon sea salt
1 teaspoon baking powder
1 teaspoon baking soda
1 teaspoon xanthan gum


Add in and beat till smooth:

1 cup warm coffee (not too hot or it will make the potato starch gluey)
1 tablespoon Ener-G Egg Replacer beaten with 1/4 cup warm water
3 tablespoons light olive oil
2 teaspoons bourbon vanilla extract
1/2 teaspoon light tasting vinegar

Beat the batter for a full two to three minutes until all the ingredients are incorporated and the batter is smooth. Using an ice cream scoop, plop the batter into the cups and smooth the tops. Bake in the center of a preheated oven till done- about 20 minutes or so. Cool the cupcakes on a wire rack (don't let them sit in the baking pan too long or they'll get soggy). Frost when completely cooled. See recipe for coffee flavored icing below.

Vegan Coffee Icing Recipe

2 cups confectioner's (powdered) sugar

2-3 tablespoons Spectrum Organic Shortening (or Earth Balance margarine)

2-4 ounces cold coffee, as needed

1 teaspoon bourbon vanilla (or a half tsp of almond extract)

Starting with the least amount of liquid, beat the sugar to incorporate the shortening, coffee and vanilla. if you need more liquid, add a small amount at a time. beat for two minutes or so until smooth. If you need to stiffen the frosting, add a little more confectioner's sugar. Chill the frosting before using it. I chill it, covered, for roughly an hour ( I didn't chill it all and used it right out of the bowl). Frost the cupcakes. Cover in an air-tight container until serving. best eaten the first day. If making ahead of time, chill frosted cakes briefly in the freezer before wrapping individually and freezing. Makes twelve cupcakes.

Wednesday, March 23, 2011

Creamy peanut butter frosted chocolate cupcakes!

I've been sitting on posting this for a few days, as I just hadn't taken the time to sit down to write out the recipe, but this is one of my favorite flavor combinations. Who doesn't like peanut butter and chocolate together?


From the ever famous cookbook, Vegan Cupakes Take Over the World, by Isa Moskowitz and Terry Hope Romero, this is the standard chocolate cupcake recipe, which makes a dark, and nearly black cupcake, using dutch processed cocoa.


vegan cupcakes with peanut butter frosting

Chocolate Cupcake

1 cup soy or non dairy milk
1 tsp apple cider vinegar
3/4 cup sugar
1/3 cup canola oil
1 tsp vanilla extract
1/2 tsp almond extract or more vanilla
1 cup all purpose flour
1/3 cup dutch cocoa powder, or regular
3/4 tsp baking soda
1/2 tsp baking powder
1/4 tsp salt

Preheat oven to 350 degrees, and line muffin pan with cupcake liners.
Whisk the soy milk and vinegar together and let sit for several minutes.
Add the suagr, oil and extracts, and whisk till foamy.
In another bowl, add dry ingredients, sift, and mix till combined.
Add dry ingredients in two batches to the wet ingredients, and beat till no lumps remain. A few small ones are acceptable.
Pour into liners, 3/4 full. (original recipe states 12 cupcakes, I usually get 13 or 14)
Bake 18-20 minutes, till toothpick comes out clean. Transfer to a cooling rack to completely cool before frosting.

vegan cupcakes with peanut butter frosting closeup
Closeup of the yummy pieces parts!

Peanut Butter Frosting

(Note: The above are mini cupcakes, so I actually only made half of the frosting recipe to pipe, but if you make regular sized cupcakes, you will have plenty of frosting to pipe down in the center, for creamy filled mouthfuls!)
1/2 cup of Earth Balance, non dairy margarine (It's also trans fat free, and whey-less!)
2/3 cup peanut butter
3-4 cups of confectioners sugar
1 tsp vanilla
1-2 Tbsp of non dairy milk

With an electric mixer, cream the margarine and peanut butter together, till creamy, for about a minute. Add remaining ingredients, and start mixer out on low speed, and gradually increase, to prevent a powdered sugar cloud. Mix till light and fluffy- about another 1-2 minutes.  Using your favorite piping tip, frost till your heart's content!

I had left over caramelly goodness in my fridge, which I used to drizzle over these cupcakes, and added some finely chopped peanuts on top.

Thursday, March 17, 2011

Celebrating St. Patrick's Day with cupcakes!

Today's cupcakes are a chocolate banana with what turned out to be a frosting that ended up like a syrupy caramel.....all good in my book! Celebrating the holiday for looks, the pretty cupcake is adorned with a colored coconut dollop. This recipe comes from The Novice Blog


vegan chocolate banana cupcakes 2
vegan chocolate banana cupakes


Chocolate Banana Cupcakes

1/2 cup coconut milk
1/2 cup ripe banana (about 1 1/2 bananas)
1/3 cup canola oil
1 teaspoon vanilla extract
3/4 cup sugar
1 cup all-purpose flour
1/3 cup cocoa powder
3/4 teaspoon baking soda
1/2 teaspoon baking powder
1/4 teaspoon salt
1/8 teaspoon cinnamon

Preheat oven to 350 degrees F. Line muffin pan with paper liners. Makes 12 cupcakes.

In a small bowl, mash the banana with a fork. Whisk in the coconut milk, sugar, oil, and vanilla extract until incorporated. Mixture will still be a little lumpy because of the nature of the banana, but whisk out as many large lumps as you can. In a separate bowl, sift together the flour, cocoa powder, baking soda, baking powder, cinnamon, and salt. Make a well in the center of dry ingredients and pour in banana mixture. Stir until just smooth (do not overmix).

Pour into liners, filling each with 3 tablespoons of batter (cups should be no more than 2/3 full). Bake 18-20 minutes, or until a toothpick inserted into the center comes out clean. Transfer to a cooling rack and let cool completely.

The frosting came from this site, and I will change the directions to reflect what I had to do with it...Grist.org

Vegan Coconut Milk Chocolate Fudge Frosting


Make sure you have your cupcakes ready to ice before beginning the frosting. It will set up quickly. If it fully sets up before you finish icing your layers, warm it slightly in a bowl set over simmering water. You can thin it further with a few drops of coconut milk.  (I found this wasn't necessary)

1/4 cup virgin coconut oil
1 1/2 cups sugar
1/4 cup unsweetened natural cocoa powder
1/4 teaspoon sea salt
1/2 cup coconut milk
1 teaspoon vanilla extract

Melt the coconut oil in a medium heavy-bottomed saucepan. Stir in the sugar, cocoa powder, and salt.

Add the coconut milk, stir well, and bring the mixture to a boil. Adjust the heat to a steady but gentle boil and cook for 5 minutes, stirring often. The mixture should begin to thicken.

Remove from heat and stir in vanilla. Set the chocolate mixture aside to cool for about 30 minutes. ( I needed to put my pan in a cold water bath to get it to thicken up enough to spoon over the cupcakes. Make sure it's thick enough, or you'll lose alot with it dripping off of the cupcakes!)

Beat the frosting until it thickens, about 20 strokes with a wooden spoon. Spread it over your cupcakes.

Any leftover frosting can be poured in a pan, allowed to harden, and cut into squares like fudge.

The green coconut is approx 2/3 cup of coconut placed into a ziplock bag, drop 2 drops of green food coloring in, zip the bag closed, and shake till color is evenly distributed. Apply coconut evenly over all 12 cupcakes, while frosting is still wet, and not set up.

Recipe for vegan Southwestern Pot Pie

There are some days when you still want some warm foods, that come in casserole form. Yesterday was one of them, so I searched through my many cookbooks, and came across Robin Robertson's Cornbread Topped Southwestern Pot Pie. This is adapted from her original recipe.

vegan southwestern pot pie

Southwestern Pot Pie

1 Tbsp olive oil
1 large onion chopped
1 large carrot, diced finely
1 red bell pepper seeded and diced
3 large cloves of garlic finely minced
1 cup of corn kernals, fresh or frozen
3 cups of cooked pinto or black beans, or 2 cans of either, rinsed well
1- 4 oz can of green chilis drained
1 cup of vegetable stock
1 Tbsp of Tamari or soy sauce
1 Tbsp of chili powder
1 tsp of cumin
1 canned chipotle chili pepper with 1/2-1 tsp of adobo sauce. (Freeze the rest individually, and keep in a freezer bag to have on hand)
1 Tbsp of cilantro leaves chopped

Cornbread Topping

1 cup cornmeal
2 tsp baking powder
1/2 tsp baking soda
2 T oil
1/2 cup non dairy milk


In a large dutch oven or soup pot, heat 1 tbsp of oil over medium heat, add onion and carrots and cover, cooking till softened- about 5 minutes.

Add peppers, garlic, corn, beans, and chili peppers. Stir in the stock, tamari, cilantro and spices. Lightly simmer, covered, for about 10-15 minutes till carrots are nearly tender.

Transfer to a 2 qt baking dish. Mix the cornbread topping, and spread in an even layer over the casserole. Bake at 350 degrees for approx 20-30 minutes, till hot and bubbly, and cornbread is lightly browned.

Saturday, March 12, 2011

More Vegan cupcakes! It really isn't all I know how to make, I swear!

One of my fellow coworkers retired yesterday, and we had a food fest at work, and I was responsible for making, guess what......cupcakes! This coworker has been a nurse twice as long  (44 yrs) as I have,  and has worked at our place of employment for 34 or 36 yrs....I forget already. That is dedication to say the least. Nursing is hard work, and to stay in one place for that long, is to me, rather incredible.  Good luck Yo- we're going to miss you, but it brings me great pleasure that we got to eat yummy food together!

I have found out through my most dedicated coworkers,  what cupcakes tend to go rather fast! I believe the site of  CHOCOLATE anything, makes people salivate. Combine chocolate cupcakes with peanut butter frosting and filling, and that is a win win combination! The other cupcakes were vanilla with a mint chocolate ganche filling, and a buttercream frosting, using Earth Balance margarine.


vegan cupcakes

Don't forget people....we are talking the most awesome of vegan cupcakes here! So much so, that a day shift nurse called back to the unit, asking for me, so she could tell me how awesome they were, while talking illegally on her cell phone, driving! Really...she did. People don't realize that vegan baking is not hard or a mystery, but it is chemistry, and much healthier!

Saturday, February 26, 2011

Vegan cupcakes rock my world!

I'm on a cupcake baking kick right now, also practicing my food photography along the way. Love natural light, but that means you have to cook and photograph during the day, which is sometimes kind of hard with my schedule. I have been lucky enough though to make sure I have day light hours to photograph these beauties!

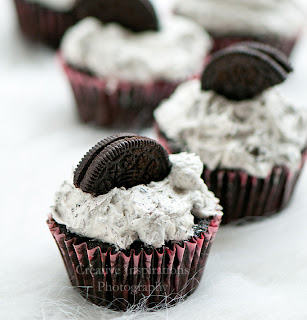
The first up is Oreo Delights, which I can tell you, caused more than just the women at work, to go nuts....even the guys were raving about their deliciousness!

vegan oreo cookie cupcake
I happened to take two different setups of that particular cupcake so the other is more of a high key, but on white fur.

vegan oreo cupcake
then another one made recently for a family get together were also snapped up in a jiffy! These are chocolate with a chocolate buttercream frosting, which also provided filling for the center of the cupcake. Bed Bath and Beyond has a cupcake corer/filler tool that is actually pretty nice, but while I didn't think of it, a small round cookie cutter would have been cheaper and just as effective!

ok.....you better check your keyboards to see if there's any drool dribbles on your keys!  Enjoy your baking adventures!